Showing posts with label Recipes. Show all posts

Wednesday, October 3, 2012

Chocolate Raspberry Truffles

Have y'all had or made the famous Oreo Truffles? So simple right?

Well, for those of you who haven't, here's the recipe, right on the Kraft website: Click HERE

Oreo, Cream Cheese, Chocolate Chips - Vwa-La - Oreo Truffle!
No baking, no cooling, just refrigerate and Enjoy!

Now, what if I told you they get better? And after I tell you how to make them better, I'll tell you they get ....E-V-E-N......B-E-T-T-E-R! Yep, true story.

Here's the better:

Did you know there are mint and peanut butter flavored Oreos?? Did you realize that if you substitute the regular Oreos in the recipe then you've got two new flavors?

Better right?

Ok, It get's better part:

THEY MAKE BERRY FLAVORED OREO'S AND YOU CAN TOTALLY PUT RASPBERRIES ON TOP AND THEY ARE SO SUPER DUPER STINKIN CUTE AND RIDICULOUSLY DELICIOUS

There I said it. I said I'd show you something better - and I did! Wam-Bam-Thank You- Ma'am


Photobucket

Seek out the pink package. Follow the recipe for Oreo Truffles (found pretty much all over the internet). Then top with half a raspberry and Enjoy! Seriously, so delicious

Photobucket

** Note: For dipping chocolate I usually use chocolate chips with a little oil or use melting chocolates**

**Also, if you refrigerate the Oreo's and cream cheese mixture before dipping in chocolate they form into balls better when dipping in warmed chocolate**

Tuesday, October 2, 2012

Hey Jaclyn: Skillet Stew {By Karen}

Photobucket

 Guess what I cooked up tonight? It's a special "Karen Creation" & I call it Skillet Stew! It is the hubs FAVORITE meal. I can't remember exactly how I came up with it, but I've been making it since shortly after we got married. I know it started with a recipe for some kind of stew & I didn't have everything it needed so I improvised. Improvised meals are sometimes the BEST, don't you think?


Photobucket

The cool thing about this recipe is that it only takes 45 minutes or so & the most effort you put into it is to chop up some potatoes! It is such a hearty, relatively healthy & easy meal, but it will make the biggest meat lover HAPPY!

So here it is...


Photobucket

Karen's Skillet Stew

1lb ground beef
2 potatoes, peeled & cut into chunks
1 1/4 cups Beef Broth
Frozen mixed veggies, no exact quantity, whatever your family likes and will eat
1 can creamed corn

Brown the ground beef, season with salt & pepper, garlic & cumin. Add potatoes & beef broth to skillet. Simmer 20-30 minutes until potatoes are fork tender. Add frozen veggies and creamed corn. Heat on med-high until completely hot (to cook the veggies, since they're frozen & all, hah!)

That's it! My hubby loves this stew with corn bread or a nice French bread slice - so easy & delicious. Hearty, warm & cozy.

Have fun with it & I hope your reader's enjoy it too!

Enjoy

All About Karen


Thursday, September 27, 2012

Throw-Back Thursday: I just couldn't help myself

Photobucket

 First Published:Saturday, August 13th, 2011

I just couldn't help myself

I just couldn't help myself....but I baked a few more shortcakes this morning!!! So delicious. My excuse was that we were out of milk (1%) and THAT'S WHY I had to make something else for breakfast, rather than sipping down the usual Carnation Instant Breakfast.....But really I was craving the deliciousness of fruit accompanied by sweet biscuits and fluffy whipped cream.

We didn't have any strawberries this morning, so I opened up some peaches and vwa-la! Breakfast.....................................................and afternoon snack...............and possibly even before bed.
Photobucket

I think next time I want to heat up some berries to put over top; blueberries, raspberries, boysenberries....I think I'm salivating as I type..my goodness


Wednesday, September 26, 2012

Love Me Some Chips

I absolutely love love LOVE homemade tortilla chips. Especially flour tortilla chips. Seriously, you know how you can just sit there and munch munch munch on a bag of chips? Can you imagine how it is with homemade ones? WOWZA!


Photobucket

They really are simple to make. Scouts Honor. Here's How Simple:

Decide whether you'll be having flour or corn chips, or both like we do! Before slicing your tortillas go ahead and heat up some vegetable or canola oil in a pot. (Size pending how many chips you will be making). Vegetable oil will give you more crispness, canola oil will be slightly healthier and still give a great taste. (We usually use canola oil.) Fill pot about a 1/3 to 1/2 the way full. You want to make sure tortillas have enough room to "float" and crisp up, without touch bottom of pot.

While oil is heating, cut tortillas with large knife into "chip size." They can be triangles, rectangles, whatever fits your fancy.

OOOO...totally just had a great idea....if making for a fun occasion using a cookie cutter, like a star or heart....ooooo I so wanna do this!!! 

  Photobucket

Once tortillas are cut, sample oil to see if it is hot enough. Take one cut tortilla and dip into oil just slightly. If it starts to bubble than you're good-to-go.

Photobucket

Toss in about 6-10 sliced tortillas (depending on size of pot). Using a large metal spatula with holes, I use my "Skimmer" you can flip the tortillas as they become crisp. Chips take about 60-80 seconds to crisp.

Remove from oil and place on a plate with paper towel to soak up any excess oil. Sprinkle with salt and try to resist until they cool!

Serve with your fav salsa....Mmm....Mmm...Mmm!

Tuesday, September 25, 2012

Hey Jaclyn: Old Fashioned Pancakes {By Karen}

Photobucket

Guess what my HUBBY cooked up this morning? Pancakes...from SCRATCH! He really is the best husband in the entire world (in my opinion anyways) & let me sleep in this morning. I was woken up to a kiss & a "Honey, I made pancakes."

This made me wonder because I knew we were out of Bisquick...Hah!


  Photobucket

When I finally hauled myself from the bed I was really curious just how he'd made pancakes. This awesome husband of mine GOOGLE'D "pancakes" (duh?? LOL) & found this recipe for

"Good Old Fashioned Pancakes" on allrecipes.com


Photobucket

Now, the hubs is a little different from me when it comes to trying a new recipe for the first time. When I try a new recipe, I like to follow the recipe to the letter and if I like it, I'll change it up a bit, personalize it if you will, the next time around.  Not my husband. No, he gets a recipe & is like "I want to do things MY WAY!" right from the get-go. Drives me insane! But, this time, his little changes worked so well - these pancakes were perfect!

Here's the link to the recipe...


Photobucket

Hubby added:

-an extra egg
-an extra half tablespoon of sugar
-a splash of vanilla

Am I the luckiest lady ever?? Not only is my husband thoughtful & caring but he's also a great cook! (like me! HA!)....

All About Karen 


Wednesday, September 19, 2012

St. Louis Butter Cake

A few weeks ago a girlfriend of mine and I were chatting about an upcoming dinner we were planning. Her husband loves loves loves chili & corn bread, and then to come to find out this "non-dessert-craving-man" ("is there really such a thing" you may be asking yourself - yes, yes...there is such a thing of a man.....or dare I say woman....not being a sweet fanatic like myself), well, come to find out he actually really really enjoys Red Velvet Cake. which happens to be one of my favorites too!

So here we were, planning a fabulous meal for her hubby, and mine as well, since he's a big fan of my chili recipe too and then all of a sudden we go off on a tangent about another dessert.

(Like how I say, "all of a sudden", like ME trailing off onto another subject is uncommon...hah!)

We get on the topic of Butter Cake! Now I have never experienced butter cake, only once had I even heard of it and that was on....oh whats the show called....come on you "so called" sweet lover.... oh yes, Cooking Channels Unique Sweets.


She goes on to tell me that one of our local restaurants has this "Butter Cake" that she is absolutely in love with.....craving, dreaming, gotta-have-it type of dessert....She even said she tries her best to offer some OBVIOUS hints to her hubs to pick a slice up for her on his way home from work....(her "hints" rarely work though....)

Photobucket

So in the midst of planning our husbands "dream dinner" I decided I would surprise my dear friend with her very own WHOLE butter cake....way more than anyone would ever need to oneself, but all the while fulfilling all fantasy's of this dreamy delight!

Never eating or making a butter cake before I searched the web for the best foodie blogs around and came across Smitten Kitchen.  I instantly fell in love with her tone of voice in her posts and her photography made my heart smile :-)


Photobucket

Her recipe for St. Louis Gooey Butter Cake seemed sure to satisfy and oh boy did it! My girlfriend was shocked as I brought over an entire tray, but welcomed it with open arms and fork in hand! I loved that while she was saying, "Seriously, you didn't have to bring this over" .....she grabs a plate for herself...hah! Love Her!

I encourage you to take an afternoon, scroll through Smitten Kitchen's pics and whip up her recipe for Butter Cake. Her recipe can be found HERE.

Enjoy!

Tuesday, September 18, 2012

Hey Jaclyn: Chocolate Banana Pudding {By Karen}


Photobucket


Guess what I made up tonight? It's a chocolate banana pudding! Umm...can you say indulgent? It is loosely based on Paula Deen's recipe for "not yo' mama's banana pudding"

Photobucket

 I say  loosely based because I used store brand vanilla wafers, chocolate pudding & I ended up not having enough whipped cream, hah! My girlfriend brought over dessert last week and it was her version of Paula Deen's banana pudding...with coconut & pineapple for a tropical flavor. Coconut & pineapple are not really my favorite things so I went back to the original recipe & put my own spin on it. It is deeeee-licious lady!

Photobucket

So the link for the original banana recipe is above. Here are my changes...

-Vanilla wafer cookies to line the bottom of the dish
-Chocolate pudding mix (15 oz package)
-8 oz container of Cool Whip (instead of the 12 it calls for)
-Chocolate syrup drizzled over the top

ENJOY!

 All About Karen


Tuesday, August 7, 2012

Red Velvet Cheeseball {Recipe}

Red Velvet Cheese Ball.......well let's start with the "Red Velvet" part ... who doesn't love that?! Seriously? And then a Cheese Ball - well you may think its a little bit crazy to call a cheese ball sweet, but just go with it.

Usually when you think cheese ball, you probably think savory cream cheese that you would be enjoying with some sort of cracker....but imagine if you will, a ball of sweet goodness that you dip with COOKIES!! Yes! Cookies!

Sounds heavenly right?


redvelvetcheeseball

I came across this recipe by Taste and Tell via Pinterest and fell in love. The one thing I did do differently as far as the recipe goes, is I used regular sized chocolate chips and chopped them a bit. And then I also mixed some white chocolate chips into the cheese ball for some added sweetness and flavor. Y'all know about my sweet tooth!

So hop on over to the "Taste and Tell" Blog and check out her recipe. Be sure to stay awhile too, they've got some great stuff.

RED VELVET CHEESE BALL VIA "TASTE AND TELL" - CLICK HERE

ENJOY :-)

Tuesday, June 19, 2012

Hey Jaclyn: Baking in High Altitudes


Guess what I cooked up yesterday?!?! Actually, I baked it. Them. Whatever!! I baked chocolate chip cookies with the twins… I know, I know, it doesn’t sound like that big of a deal. But it kind of is considering I live in the desert, at a pretty gosh darn high altitude (almost 6000 feet above sea level)! It took me MONTHS to figure out how to adjust my cooking & baking when we moved here – I had no idea that living at a high altitude would make such a difference to so many things – even boiling water takes longer!

Photobucket

Well, I digress, dear cousin. =) As a mom, chocolate chip cookies are a staple in my baking repertoire but when we moved to this teeny little mining town in New Mexico, I really had a hard time making this one work. I finally found the perfect recipe a couple months ago…. Truly, it’s just the recipe off the back of the Nestle Toll House bag of chocolate chips, following the high altitude adjustments. They turn out perfectly every time! I am hoping that your readers that live in remote high altitude areas, like mine, might find this helpful….


Photobucket

 I also found this article handy; it talks about measurement adjustments for high altitudes in general. =)

Baking In High Altitudes:

http://www.verybestbaking.com/recipes/detail.aspx?id=18476

http://allrecipes.com/howto/high-altitude-cake-baking/


Friday, June 15, 2012

Hey Jaclyn: Chicken and Ratatouille


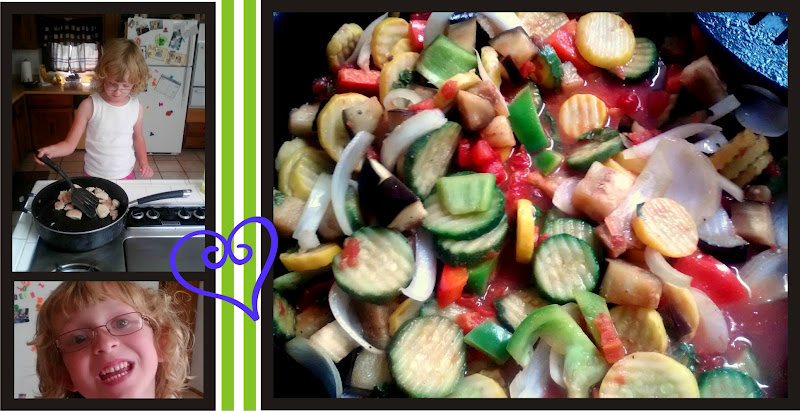
Guess what I cooked up the other night??  Chicken & ratatouille pasta! Can you say delicious?!?! 

The twins have been obsessed with the movie “Ratatouille” lately so of course we had to try & make it. I looked up ratatouille on foodnetwork.com & found this recipe for “Round 2 Recipe – Chicken & Ratatouille Pasta”. 


Even though it’s not “traditional” ratatouille, I thought that Gary & the kids would like it better because of the pasta & chicken. Since this is a "Round 2 Recipe", there is another recipe within this one, for a grilled vegetable Panini… then the ratatouille pasta is made from the leftover vegetables. I didn’t do this because it wasn’t a "Round 2 Recipe" for me.  {Jackies note: Great idea by Food Network by the way - adding in additional recipes that you can make with leftover ingredients or meals - good one FN!}


I bought a fresh eggplant, a bag of frozen zucchini & yellow squash (I couldn’t find fresh yellow squash anywhere for some reason!!), canned tomatoes & chopped up a fresh onion. The basil was from the produce section… you know the ones that come in the little plastic boxes? 

That’s a lot of garbleygook I mean, information up there isn’t it?? This recipe was very simple; Vicki helped with most of it… everything except the chopping really.  It was simple, healthy & delicious. It dawned on me when I was chopping up the eggplant that I had never had it before…. & I loved it! It was sweet! {I didn’t know eggplant was sweet. LOL}

For the Chicken & Ratatouille Recipe from Food Network Click HERE, then follow Karen's suggestions. 


This recipe was great with chicken but would also be yummy with crumbled Italian sausage or smoke sausage!

Sunday, June 10, 2012

Hey Jaclyn: Vicki's Baked Potato Bites


Guess what I cooked up tonight?? I haven't decided exactly what to call them yet but I'm thinking something along the lines of "Vicki's Baked Potato Bites" or "Vicki's Favorite Popped Potatoes".... Vicki {Karen's daughter - in case you guys didn't know} loved them & she said that they tasted like a baked potato that had popped open (she loves baked potatoes). Anyways... they were so simple but so yummy! I had some red potatoes that I'd purchased last week & not used for some reason so tonight I chopped them up into bite sized pieces (with the peels on), tossed them in some vegetable oil & then seasoned them with salt, pepper, garlic, a little bit of paprika & a little bit of Montreal steak seasoning. I sprayed a cookie sheet with a little bit of cooking spray (just to be safe, cause we all know there's nothing worse than stuck-on potatoes!!!) & baked them @ 375 for about a half an hour or so, until they were fork tender. When I took them out of the oven, I sprinkled just enough shredded cheese to make any kid happy. Yum-o!

Photobucket


They were so yummy! Perfect side for our grilled hot dogs tonight. The whole family loved them! Give them a try, I'm sure the family will love them.... =)

Wednesday, May 30, 2012

Pretty Pink Pies by Karen

Photobucket

Guess what I cooked up last night? They are called "Pretty Pink Pies" and I found the recipe in this silly little cookbook I ordered out of one of the twins' fundraiser catalogs. It's called Silly Snacks- Family Fun in the Kitchen and it has all these awesome snack & desserts that you can make with (or for) your kids.


Photobucket

 Anyway, we were going over to our friend's house for a bbq the other night and I had said I'd bring dessert, but when the time came I REALLY didn't want to turn on the oven to make cookies or cupcakes; it was just too hot. So I started flipping thru this little cookbook because I remembered it had lots of easy, non-baking things in it and came across these little pies. They just looked so yummy and refreshing..& they were! Here's the recipe -- I know you'll want to try them!


Photobucket


Pretty Pink Pies
Makes 6 servings

1 small ripe banana, sliced
1 package mini graham cracker crusts (6 crusts)
2 tablespoons chocolate syrup/ice cream topping
2 containers (6oz each) strawberry yogurt
6 mini marshmallows
6 fresh strawberries cut into wedges

1.       Place banana slices in each pie crust. Drizzle with 1 teaspoon chocolate syrup. Spoon yogurt over top.
2.       Place 1 marshmallow in the center of each pie. Arrange strawberry pieces around marshmallow to resemble flower. Serve immediately or cover & refrigerate up to 4 hours.
Photobucket 


Photobucket
I did not measure out the chocolate syrup, I just eyeballed it and put what appeared to be a decent amount on top of the bananas. I also didn't "wedge" my strawberries, just quartered them, so its not as pretty but it worked. Oh, since I was making more than 6, I just bought a large container of strawberry yogurt, it's less expensive that way & yogurt never goes to waste in my house! 

Thursday, January 19, 2012

Thankful Thursday: Convience

This week I realized how thankful I truly am for convenient healthy food. This is not something you'd think would come out of my mouth, since I'm usually complaining that there are no healthy drive-thru spots near me; that someday I'm going to open up my own restaurant and have curb-side pick up specifically catering to mom's with car loads of kids that are just eager to grab a delicious healthy meal who before only had the options of (1) drive thru some greasy-not even good burger joint (2) going against all that is true about starving kids right before nap time and convice herself that "this time they'll be good" as she tries to lug them out of the car just to grab her order or (3) the choice of starving to death until the kids go down and then indulging in something sweet instead of nutritious.

You know who you are.

Just the other night I was planning to make spaghetti and chicken for the family, while I would leave off the noodles and stick tight to my diet. When my husband arrived home from work, I was secretly hoping that he'd suggest going out to eat since I was exhausted and quiet frankly done with being in the house, but I quickly hopped up and started to begin dinner. On edge from being overly hungry 30 minutes prior I soon realized that the chicken I planned to fry up was bad. (another story - our refrigerator was acting funny this week - ugh) Hubby said he would stay with the kids so I could just run real quick to pick up some chicken from the store. I really think he just saw the crazy in my eyes and for the sake of the children - sent me packing!

When I arrived at the store I circled the parking lot three times, just to find a parking spot.
Have you had one of these days? No food, No Parking, No SMILES WHAT SO EVER!

I ran in the store, headed to the meat department and ...

...nothing

No Chicken. None - Zip - Zilch. Really?

Ok - you may be sensing a bit of high school drama queen in today's post, but honestly, I probably could have been standing there in a turquoise puffy prom dress with a sparkly crown and it would have described my feelings perfectly.


I then asked the butcher, who to my surprise spoke to me like a medieval knight, informing my-lady that there was a box in the back and he would scurry off to go get it.

I'm not joking - MEDIEVAL

Anyways, I do have a point to this post - and a recipe, so stay with me. 

While waiting for the meat man I strolled through the health food aisle salivating over even the gluten free cookies or protein bars when I came across their soup. I love soup and one caught my eye in particular; the lentil soup. Lentils fall in to the legume category in my diet and I quite frankly have been avoiding it. I quickly checked the ingredients and found all vegetables, some balsamic vinegar and no added crud that takes all the nutrition out of it. YEAH!  I decided that it would be perfect for my way to late dinner and was so so convenient!

THANKFUL FOR CONVENIENCE!

When I got home I fried up one of the chicken breast, heated up the soup and mixed them together. So delicious!

Convenient Recipe right? Is it actually a recipe? Or more of a suggestion? 

So go on - whip up some convenience


Photobucket

Wednesday, January 18, 2012

Woo-Hoo Wednesday: Staying on track

Soon I will be getting back to incorporating some party and decorating tips in to my blog, but I'm not going to lie - I'm kind of on a new recipe kick and it's keeping me on track. I was in a bit of a rut at the end of 2011 just making our same ol always delicious recipes week after week. But now I've been pretty consistent with throwing together a new meal each day, so of course I have to share it with all of you.

Today I want to share with you my yummy breakfast omelet.

Photobucket

But before we get in to the recipe, did you know omelet was spelled that way? or is it omelette? To be completely honest, I always spelled it omlet (the way I say it), until today, when I did a bit of research on the omelet. hah! Anyways, that's just me being crazy, lets get back to the breakfast omelet. 

There are several variations of omelets, and really, each country has its own version, for example the Italian Frittata. What I love about omelets, and eggs in general, is the ability to make so many different and delicious dishes, all starting out with the same concept or ingredient.

Here's something crazy for you - in 1994, Japan used 160,000 eggs making the worlds largest omelet at the time, quickly being beaten (no pun intended) by Canada in 2002. Crazy right?

Alright lets get to the recipe.


Breakfast Omelet

Ingredients:
2 egg whites
1 whole egg
1/2 cup chopped red onions
1/2 cup pinto beans
1/4 cup spinach (I used frozen spinach)
1/3 cup rotel (canned tomatoes with cilantro and lime)
Garlic, pepper, cumin to taste

In a small skillet, saute chopped onions with a bit of olive oil and seasonings. When onions become limp they are ready.

Spray a medium skillet with cooking spray. Crack eggs and stir with your spatula, making sure your one egg yolk has cracked and is mixed in with the egg whites. Turn heat to medium. While eggs are still wet, add additional ingredients; cooked onions, beans, spinach, rotel, to one half of the eggs in your pan. (Make sure you add your ingredients when the eggs are still wet. If you wait too long they will have nothing to "stick" too and end up flying everywhere when you try to remove your omelet from the pan)

Keep the omelet "open" until the eggs begin to dry out. You can even shake your pan a bit to see if there are any wet spots. Once the omelet is completely cooked, using your spatula, fold the egg half with no ingredients over the loaded side. Push down on your omelet using the back of your spatula, squishing the omelet closed.  Lift your  yummy, delicious, absolutely veggie filled breakfast omelet on to one of your favorite plates and sink your teeth into something that you'll never believe falls into the "healthy category". 

Enjoy


Tuesday, January 17, 2012

How To Tuesday: Make delicious Snicker Fudge

8 pounds.

8 pounds of flour?


8 pounds of sugar?

Nope! 8 pounds! 8 pounds of baby weight - GONE - See ya! Can you believe it? I am so happy with my new choices and ways of eating. Not only is it so yummy and delicious, but it gives me the energy I need to run around with the kiddos and be the best wife I can to my hubby. And the best part about it is....wait for it...I still get a "cheat day" once a week. Which is completely awesome for all of you, seeing as how I'm sure you've been dying for a dessert recipe. Well, have I got one for you. But before I start, I've just got to continue tooting my own horn and say that when I made this recipe over the weekend I didn't even sample it, didn't lick the spoon, didn't sneak a chocolate chip, nothing. I was a good little dieter and waited until Sunday to sample and oh my word was it delicious! I did though have my husband, brother and neighbor (all seasoned snicker lovers) be my taste testers on Saturday and they all approved! Yeah boys!

Here we go with my new recipe:

Open Faced Snicker Fudge

Photobucket

Ingredients:
1 bag semi sweet chocolate chips (12 oz)
1/2 cup butterscotch chips
2/3 cups creamy peanut butter (separated)
6 Tablespoons butter
3/4 cup sugar
1/4 cup brown sugar
1/4 cup evaporated milk
1 Jar Marshmallow Cream (7 oz)
1 cup salted peanuts (chopped)
1 bag caramel candies (14 oz)

Prepare a 9x13 inch dish by lining the bottom with aluminum foil. Next spray the aluminum foil with cooking spray and set aside.

In a microwave safe bowl, melt together chocolate chips, butterscotch chips and 1/3 cup peanut butter. Place in microwave for 1 minute, then stir. Continue to microwave for 45 seconds at a time, stirring after each until completely melted. Next, pour into the bottom of your prepared pan and spread smooth. Place in your refrigerator to cool and set.

While chocolate layer is cooling, heat butter in a sauce pan. Once melted add sugar, brown sugar and evaporated milk. Bring to a boil stirring consistently. Allow to boil for 5 minutes as you continue to stir. After 5 minutes are up, remove from heat and add marshmallow fluff, remaining 1/3 cup peanut butter and chopped peanuts.

Remove chocolate from refrigerator and pour marshmallow layer on top. You need to do this quickly so you don't heat the chocolate layer too much, causing it to melt. What I found to be helpful is if I lightly dampen my spatula with water, it helped smooth out the marshmallow layer on top of the chocolate. Once smooth, return to refrigerator.

Next, unwrap each caramel and place in microwave safe bowl. Add one tablespoon of water and then microwave like you did the chocolate. (1 minute, followed by 45 second zaps stirring after each). Once completely melted, remove fudge from fridge, pour caramel over top and return back to the fridge.

Photobucket

Refrigerate for at least 2 hours. After completely cooled, remove pan from refrigerator. Using the foil to lift the fudge, place it on a hard surface. Using a large knife, cut fudge into small pieces to enjoy. Store in refrigerator until ready to serve.

Enjoy

Thursday, January 12, 2012

Thankful Thursday: My Skillet

I am so very thankful for the skillets I have, all varying in size. Think about it - what have you made in a skillet? Eggs? Bacon? Rice? Chicken? Dumplings? Pancakes? I could seriously go on and on and on about the pans that I own. Skillets date back way to the Romans, but one thing I found really interesting is that prior to cooking stoves there was a cast iron skillet called the "spider". It had a handle and three legs so it could stand over the coals of a fire. Neat Right? 

Photobucket

Well, if you read my post from yesterday, you would have saw that I'm on some what of a diet. Ya, you heard me - a diet! I have been using my skillet for pretty much every meal, unless its a salad, and the food has been delicious!

Today I made what I'm going to call the: EVERYTHING BUT THE TORTILLA
It was so yummy that I'm thinking I can even get my hubs to eat this too! But shh, don't tell him there is spinach in it.

Everything But The Tortilla
Ingredients: (this makes enough for 2 meals or 2 people)

1/3 cups frozen spinach
1 can Rotel - with Lime & Cilantro (Rotel can usually be found in your canned vegetable section)
2 green onions
1 chicken breast
Seasonings of choice
Olive Oil (for chicken)
1 can Refried Beans
1/2 can Pinto Beans

Cook chicken in your skillet with a bit of olive oil for about 15 minutes or until cooked throughout. Season with your favorite spices.

Once chicken is cooked, remove from skillet and chop into pieces. Next, add chopped green onions and frozen spinach to pan and saute until a bit browned.


Photobucket

Once browned, add Rotel, 1/2 can pinto beans and chopped chicken and heat until hot.

Photobucket

Prepare your bowl with a bed of refried beans and then cover with chicken salsa mixture. Enjoy and be satisfied.

Photobucket

Wednesday, January 11, 2012

Woo-Hoo Wednesday: Loosing The Baby Weight

Woo- Hoo It's Wednesday! I am so excited to announce that I am just one pound away from loosing my "pre-2nd-child" weight (about 25 more to "pre-1st-child" and hmmm.....a few more to "Wedding Day Weight"). How did I do it you ask? Well, like many I vowed to get out there and push that stroller  - you know, because it is good for the kiddos to get outside plus all of the benefits of loosing that baby weight would just shed off, right? 

Ya, well, like many of us out there who are not the "I've gotta exercise in order to function" type people, I was functioning just well on my couch with a bowl of ice cream each afternoon. The vow to exercise with the kids quickly dwindled after a few months, I got back into my old "pregnancy" routine and stayed at a consistent weight (over weight) for about 5 months or so. Which in my head was justifiable since I wasn't gaining weight.

But it brought me back to the feeling of being overwhelmed each time I tried to pick out an outfit and trying to hide the extra weight with belly bands and my pregnancy shirts. (and on my way to digging out the dreaded pregnancy jeans) 

Now I am by no means here to preach the word of nutrition or say that my recipes follow all the guidelines of other weight loss programs, but I'll tell ya one thing - It's working for me, so I think I'll stick to it! 

My amazing brother has been staying with us for a few weeks and well, he's always an inspiration to get "get out there and move it!" Let's just say we are pretty much polar opposites when it comes to fitness and here's just one (of many)  examples. When we were younger, when I was feeling under the weather, I'd scoop myself a mug of sherbert ice cream (or not gonna lie, sometimes the creamiest of vanilla's) and turn on a Disney Movie, sure to make me feel better. And every time, my brother would then come into the living room and proceed to do either pushups or crunches every time a song was sung during the movie. Have you ever seen a Disney Cartoon? It's practically ALL singing! Nut-Case! One fit, hard working, perfect bod "nut-case". At least thats what I told myself as I dove in for another  bite of chocolate chip, chocolate syrup milkshake -- oh wait, I mean "sherbert". 

Anyways, he's here now with us and has me on a high protein diet and we have eliminated dairy and sugars. I get to choose a protein, legume and vegetable for each of my meals and although I am craving a few of my old habits - like some ice cream at 2:00 pm when the kids are napping it really isn't that bad. Both of us agree that its a delicious lifestyle if you know how to cook! hah.

Then here's the kicker!  I get a "splurge day" once a week in order to trick my metabolism. Which brings me back to my original thought that I'm not here to preach the right way to loose weight, but I've got to say - loosing 5 lbs last week in just two days, and then 6 lbs this week in two days - I think I'll stick to it. (I do have to mention though that my splurge last week was 4 days while I was in California for my brother-in-laws wedding, so technically this week is the official start week!) 

Ok - now don't start hyper-ventilating.  I am by no means turning to a "Healthy Eating Blog". No way - Have you seen my Pinterest Account? I've got loads and loads of recipes that I want to test out and share with you. But we'll be sticking to those on "splurge day".

The recipe I want to share with you is one of my favorites so far. I'm not going to lay it out in a traditional format, so please follow along.

Photobucket

Chicken:

1 Chicken Breast
A bit of Olive Oil
Seasonings of choice (except salt)

I pan seared the chicken breast for about 15 minutes until cooked through. Just lightly glaze your pan with the olive oil. Coat your chicken with your favorite seasonings (personally I like them a bit on the spicy side). Then cover with a lid and cook till no longer pink on the inside

Pinto Beans:

1/4-1/2 can Pinto Beans

Heat until hot.

Onion Salsa:

1/2 white onion
1 can Rotel with Lime Juice and Cilantro (Rotel can usually be found in the tomato sauce and canned vegetable aisle)
A bit of Olive Oil

Saute onions in olive oil until caramelized.  Next add entire can of Rotel and cover with lid for about 10 minutes or until hot.

Once all ingredients are cooked and hot, chop your chicken and toss in a bowl. Mix together salsa, beans and chicken and satisfy those beautiful taste buds of yours! Enjoy.

Thursday, December 29, 2011

Thankful Thursday: My beautiful daughter

Since we've been talking all about my daughters birthday party this week, I thought it only appropriate to dedicate my Thankful Thursday to my beautiful daughter Aliyah. She is such a beautiful light in my life and I am continuously thankful to God for blessing me and my family with her. Now that she is getting a bit older, she is repeating everything we say and I am quickly realizing the phrases I say the most. Apparently I say "Let's See Here" all the time, because I am now catching myself saying it when I open up my utensil drawers or opening up a cookbook, cracks me up every time.

Well I wanted to take you through her Pajama Breakfast Birthday party that we had a few weeks ago.

You all saw the Cake In A Jar's that I made in my post on Tuesday. I also served some rice krispie treats in lieu of the breakfast theme.
Photobucket

Photobucket

Photobucket

As our guests arrived they were greeted with a cereal bar and cheery welcome to Aliyah's 2nd Birthday Party. You can see how I made the tissue paper backdrop here

Photobucket


The little container with the take home bags read: "Thank you all so much for celebrating with me the Most Important "Birthday" of the Day"

Photobucket

I was a little bummed that I didn't get a picture of our food table with all the food on it...leave it to the food blogger and cookbook author not to photograph the food.  I did take a photo before hand though, so that counts a little bit.

Photobucket

Photobucket

Photobucket

And of course for drinks we had iced cold OJ and Milk, as well as some homemade chocolate sauce from my parents ice cream parlor for chocolate milk!

Photobucket

Photobucket

Photobucket

Happy Birthday Baby Girl!


Photobucket

(I also made her pj's, slippers and bow too!)

As part of our Breakfast I served a new recipe of mine which was an Egg Casserole. I made ours vegetarian with only eggs and cheese, but it would also be delicious with ham, bacon or sausage mixed in; or even all three!
(and remember, I failed to photograph the food)

12 Eggs
1/2 lb grated cheese
1 cup milk
4 Tablespoons melted butter

-----
Additional ingredients
Salt, pepper
Garlic
Seasoning salt

------
And then just add what you like:
onions
meat
salsa

I prepared mine the night before, but didn't put it into the casserole dish until that morning. My reason being, because you melt the butter in the dish I didn't want it to get cold again -- I didn't think it would have the same effect as having the melted butter surround the casserole.

Whisk together eggs, along with milk and seasonings. Once whipped, add in cheese and meat. Stire together and store in a container over night, if making ahead of time. If making day of, follow directions below.

In the morning, melt your butter and pour into 9x13 casserole dish. Next pour in egg mixture. Bake at 350 for about 40 minutes. It will start to puff around the outside and the middle will sink if you check it at about 20 minutes, don't worry the rest will puff up too. After the 40 minutes it should be cooked all the way through.


Enjoy warm!