Wednesday, November 30, 2011

Woo-Hoo Wednesday: Christmas Time...

I. Just. Can't. Do. It......I. Can't. WAIT. ONE. MORE. DAY!

My Christmas excitement is about ready to BURST! I know today is November 30th. And I know we should separate our Thanksgiving from our Christmas. And I know December is just one day away. I know I know I know. But seriously people -- my Christmas lights are up, my home is decorated, and I've already started blaring the Christmas music in the house and car. can you hear my music? Frosty the Snowman was a la-di-da-di-da...Ok, so I don't know the words, but neither do you. And just for a moment here, while we're talking Christmas songs, did you know when they describe Mr. Grinch, they say he has Garlic in his Soul? -- Personally, I don't really think that's a bad thing. It actually makes me salivate just thinking about it. Too much? Ok, maybe I let you inside my brain a little too much on that one, but seriously people...garlic in your soul, could you imagine? Mmmm...

So, are you on Pinterest? Well, actually should I say, are you addicted to Pinterest yet? Logged in on your stationary computer, laptop, Xoom, phone, or is this just me? 


At first I was a little hesitant about this whole Pinterest thing. What do you mean, "I have to be invited?" And what is it all about? Boards? Pins? Likes? Repin? == Huh?


Wikipedia describes behavioral addiction as a recurring compulsion by an individual to engage in some specific activity. Yup that's me! Addicted to Pinterest!

For today's, Woo-Hoo Wednesday I wanted to highlight a few of my favorite finds for Christmas DIY on Pinterest. And while we're at it, why don't you start following me too. Jaclyn Douma's Pinterest 


Photobucket
Glittery Epsom Salt Snow - Click Here


Photobucket

Decorate your staircase -  Click Here


Photobucket

DIY Christmas Cards - Click Here


Photobucket

Cinnamon Stick Wreath - Click Here

Photobucket

No Christmas Tree - Click Here - I found this one humorous 

Pinterest has so many clever ideas, recipes, home decor, everything! Check it out - And HAPPY PINNING

Tuesday, November 29, 2011

How- To Tuesday: Make a yummy leftover ham sandwich

I know, I know -- I'm excited to start talking Christmas too, but technically, I've got so many Thanksgiving leftovers I can't even imagine starting to talk about Christmas yet.

Are you still munching on leftover potatoes or ham or turkey? There are so many creative things you can make with the leftovers. My husband remembers always enjoying shredded turkey sandwiches at his grandma's house, where she would mix cream of mushroom soup along with the shredded turkey and toss it in the crock pot. She may have added a few more ingredients, but that's all he remembers, creamy - turkey - goodness!

Well, my husband nearly had a heart attack when I made him breakfast with our leftovers. I know its pretty basic, but it's the little things that really gets him going :)

Photobucket

Butter two dinner rolls and place in your broiler oven for about 5-7 minutes until toasted

While bread is being toasted, fry two eggs until over medium. (just long enough for the egg to be cooked, but a little yolk to drizzle on the sandwich).

Slice leftover ham and fry in same pan as eggs until warmed.

When bread is toasted, smother with jam or now that I think about it, you could even use your leftover cranberry sauce too!

Stack sandwich with egg and ham.

Don't forget a napkin! And Enjoy.

What did you make with your leftovers?

Sunday, November 27, 2011

Weekend Wrap: Homemade Cinnamon Rolls

Taking a moment before I jump right into Christmas mania, to talk about my wonderful Great Grandma Johnson. For years, every Christmas she would make all of us yummy cinnamon rolls that came all bundled together on a plate to enjoy. When I was first married I made sure to make a trip down to her home so she could teach me her recipe. (keep in mind, these photos are from a few years ago)


Photobucket

Photobucket

Photobucket

Photobucket

Great Grandma is always so humble, never to boast about anything of her doings, and she is appreciated by us more than she'll ever take credit for. Not only did we get to look forward to her yummy cinnamon rolls, but also to homemade pajamas ever Christmas, hand crochet's slippers and a cross stitched memento of some sort, usually an ornament. Although I haven't gotten into the cross stitching yet, I have made a few crocheted slippers, working on my daughters first pair of homemade pajamas and yes, I'm about to carry on the cinnamon roll tradition.

Photobucket

Photobucket

I love that my kids will be able to enjoy the sweet comfort of Great Grandma even though we are miles a part. Maybe next time we go visit, I'll be the one to bring the goodies!


And you thought I was going to give out the recipe, didn't you? 

Thursday, November 24, 2011

Thankful Thursday: Happy Thanksgiving

Happy Thanksgiving Everyone - What a wonderful day to celebrate and reflect on everyone and everything that I am thankful for. And how perfect is it that it's also Thankful Thursday!

I know most everyone turns to today and states that they are most thankful for their family. And this is true for me as well, but my family doesn't just include my blood family, it also include the family that I have gained by marrying my amazing husband, my family of friends whether long time or newly developed, and my family of Christian believers.

I am thankful for the family God has chosen for me
I am thankful for the support of my family and their encouragement on a daily basis
I am thankful for my family that I don't see everyday, or even every month or year
I am thankful for my close nitch friends that I consider my family
I am thankful for my friends who have only stayed for a season, because they have helped mold me into who I am today
I am thankful for my friends who have been with me a lifetime, because they are still helping me become who I am suppose to be
I am thankful for my husband who is overly supportive and loves me beyond what I can imagine
I am thankful for the beautiful children God has given me
I am thankful for my church and community of believers, who even if I don't know them personally, they inspire me each moment I am in their presence
I am thankful for each opportunity God has given me
I am thankful for the open mind and heart God encourages me to use each and every day

For all of these things I am able to be thankful because of the powerful grace and love of our Heavenly Father.

Today we celebrated Thanksgiving at my home, where we all brought our favorite dishes and enjoyed the company of one another.


Photobucket

The pumpkin for my centerpiece was a must have for me! I had seen it at Hobby Lobby for over a month, but it was way out of my price range...but then, to my absolute pleasant surprise it was 80% off just a week before Thanksgiving - cha ching!

Photobucket

Photobucket

Photobucket

See the homemade croutons? Yum

Photobucket

Wednesday, November 23, 2011

Woo-Hoo Wednesday: Homemade Croutons

Table is set and decorated.....WOO-HOO!!

I made the executive decision,(along with the low comments from my brother and husband),  that we would be having our Thanksgiving feast outside on the patio. It will be beautiful, along with freeing up some of the space in our living room/playroom/"suppose to be" dining room.

I set the table this afternoon and it looks beautiful. I cannot wait to get all of the food and everyone around it. So what usually is a Woo-Hoo party Wednesday, I think I'm going to throw in a yummy recipe instead. About 7:45 this evening, after making my 2nd stuffing (my brother informed me that his all time favorite Thanksgiving dish is our Great-Grandma's Italian Stuffing recipe - which I realized after I had already made my own version of an online recipe, so of course I had to make my Great Grandma's too!) Anyways, around 7:45 pm I also decided to make some homemade croutons for tomorrow's salad. They just came out of the oven and I think they are quite yummy!

Here we go:

Ingredients:

 oh whoa - before I forget - the decorated tables from the patio are now moved into our snug living room now that the kiddos are tucked off to bed. - they will then be back outside bright and early in the morn!


Alright - once again - Here we go:


Ingredients:

1 (1 lb) loaf of bread (I used La Brea - Roasted Garlic)
4 Tablespoons melted butter
2 Tablespoons Balsamic Vinegar
1 teaspoon Garlic Salt
1 teaspoon Dried Basil Leaves

Preheat oven: 300 degrees.

Chop bread into crouton size pieces.
Photobucket

Photobucket

Using a jelly roll pan (or something similar), arrange the bread flat in one layer.

In a small bowl, combine butter, balsamic vinegar, garlic salt and dried basil leaves. With a spoon, drizzle over bread. Using your hands, toss bread so butter sauce coats all of the pieces.

Photobucket

Let sit for 15 minutes so the bread really soaks in the flavor.

Photobucket

Place in oven for 20 minutes. Once 20 minutes is complete, flip the croutons using a spatula and then return to oven for an additional 20 minutes. (or until croutons are crunchy.)

I just took mine out of the oven and they are very delicious. (can't wait to smother them with ranch dressing.) 

I'm planning to keep mine out over night to give a little more of a crunch, but you are more than welcome to store them in an air tight container or enjoy them right now!

Yum!!

Tuesday, November 22, 2011

How- To Tuesday: How to set your table

Happy Almost Thanksgiving Everyone!
In lieu of our upcoming Thanksgiving holiday this Thursday I thought we take a moment to talk about table settings. I am anxiously awaiting tomorrow, I'm not going to lie. It means that I've made it to a negotiable day with my husband to begin decorating my table for Thanksgiving. 
Ok, let me draw you a bit of a picture. We are currently living in a 1300 sq. foot home that although perfect when it's just the 4 of us, gets a little cramped when more people join. On top of that, upon the first Christmas/Birthday for my daughter, we decided that the need for a playroom, far out weighed the need for a "look pretty" dining table, so out it went (Christmas Day). 

So, this all brings me back to decorating for a holiday. Although my husband has gotten really really really good at biting his tongue when I get on a creative-decorating kick, I am trying to respect him and the fact that our home shrinks like crazy as I begin to clutter, so I have post-poned decorating a table (that we will need to set up) for our Thanksgiving Feast.

I obviously love hosting parties and LOVE the decorating part for all to enjoy, so tomorrow is a big day for me, followed by an even better day of Thanksgiving with those I love. 

And now back to my original point - How to set your table. (You once again got a little taste of how my brain works in a round about way. )

First you  start with your plate, with a charger underneath if you are using a charger. Any cups (usually a water goblet and possibly a juice or champagne glass) will go to the right of your plate. Any salad plates (unless placed on top of your dinner plate) will go to the left of your plate.

Silverware is placed in the order your will use it, from the outside in; starting with first course to last course. Meaning if you are having a salad before your meal (or soup), the salad fork would be on the outside. Forks should be placed to the left of the plate. Knives and Spoons to the right. Make sure you place the knife blade directed towards the plate. 

If you are serving dessert, place the dessert silverware to the top of the plate horizontally. 

Hopefully this will help as you begin to set up your table. 

Have fun!


Thursday, November 17, 2011

Thankful Thursday: Thankful Notes

I am always thankful for thank you notes. Whether I'm writing them or receiving them they truly make my day.

Do you know this feeling? The feeling that someone was thinking of you, wanting to tell you how much they love you or are thankful for you, just being you? This is what I am thankful for.

I love incorporating thankful notes or words of encouragement into my parties. Advice for Newlyweds, Wishes for new babies or kind words or thoughts, always so appreciated.

Photobucket

When my husband and I were first married I started a "Thinking Of You" group, where women from our church would come over to my home to write thank you notes to friends and family they knew. I loved being a part of this and spending a moment just to stop and think of ones I love.

Another suggestion I just heard today was a "Note Shower" -- showering a friend overseas with notes of love and kindness. They planned a whole party here in the States and mailed off the letters. So thoughtful.

Take a moment this week, and send off a few letters. It'll really fill your heart!

Wednesday, November 16, 2011

Woo-Hoo Wednesday: *Surprise* Gender Baby Shower

For both of my pregnancy's my husband and I did not find out the gender of the baby until the day we were blessed to see their beautiful faces. So for my first baby showers, we obviously had a gender neutral party! My Aunt, Cousin and Mom through me a beautiful shower and I thought the "activities" were so perfect I just had to share. My aunt made sugar heart cookies and had blue and pink frosting for everyone to decorate for themselves.

Photobucket

They also had for my guest book a framed photo of one of the sonogram pictures where the guests wrote their name in either pink or blue depending on what they thought I was having. So cute! (In fact we have it hanging in my daughters room now).
Photobucket

A quick idea for a guest gift at a baby shower: (And actually a wedding or bridal shower too!). I was watching David Tutera's - My Fair Wedding this week and the featured family was a part of the Make A Wish Foundation, where the son of the Bride used his wish to have David plan their wedding. As the gift for their guests, they had silver dollars in which each guest made a wish on and tossed it into a fountain. All of the coins were then donated back to the Make A Wish foundation.

I absolutely LOVED this idea. I loved the concept behind it, loved the donation, loved the fact that each guest would truly cherish their wish in knowing their prayers/hopes would be heard and I'm not going to lie, but I really liked the cost effective part of it. Think about it...only a dollar for a guest gift? Pretty good if you ask me :)

So for a baby shower, I thought it would be fun to Make A Wish for the baby and it would be donated to either (1) a bank account/college fund for the child (2) to help the new parents out (3) to buy diapers or baby food (4) or maybe donated to homeless/abandoned mothers in the community.

Same goes for bridal or wedding gifts - Although, for a wedding, I think it should be donated to a charity rather than to the bride and groom.

I cannot wait to use this idea for an upcoming party! So fun

Tuesday, November 15, 2011

How- To Tuesday: Make Tissue Paper Puff Balls

I am currently in love with decorating with tissue paper puff balls-- my husband on the other hand, well...he's not a fan at all. I'm thinking he thinks they take up way too much room in my already over-flowing craft/decor area. hah!

I have used them several times with different parties, so I thought I'd share a few pics and then the video where I learned how to make them.

Enjoy :)

Photobucket


Photobucket

And for the video: http://www.youtube.com/watch?v=0KLZ_4sXk2E

Sunday, November 13, 2011

Weekend Wrap: Something Spice, Something Nice

For the past week or so my husband has been commenting about how much he and a co-worker of his enjoys spice cake. In fact, a week ago Friday, he suggested I make Spice Cake flavored "Cake Balls." For those of you that don't know about the cake ball trend, it is simply baked cake, mixed with frosting, rolled into a ball and dipped in chocolate. (yum).

He says, "Oooo, spice cake and white frosting, so delicious."

"White frosting sweetie? Don't you mean a cream cheese frosting?"

"No - white, that's the only way to have it."

"No, I'm pretty sure you are thinking CREAM CHEESE"

(And yes, this is a typical evening conversation in our home)


I told him to go talk to his co-worker about which frosting and that I was certainly positive that spice cake would have a cream cheese frosting. (all the while being in disbelief that this was even a discussion. I thought it was something we agreed on)

The following day, he comes back and responds, "Yes, you were right, as always, it's cream cheese" (ok, so maybe not those exact words, but I was definitely right).


I decided that I really did not want to bake a cake from scratch to turn into cake balls, not that night at least, so I thumbed through some of my recipes and came across one that was in a Holiday Magazine by Paula Deen.


Gingerbread Cake with Cranberry Filling and an Orange Cream Cheese Frosting was exactly what his co-workers needed, at least I thought so!


Photobucket

Before I get started with the recipe I want to make a few notes.
  • Start out by making the filling first as it needs to be refrigerated for at least 2 hours. 
  • When stirring your cranberry filling over medium-low heat, it states to heat for 15 minutes, which for me it only took about 12-13. 
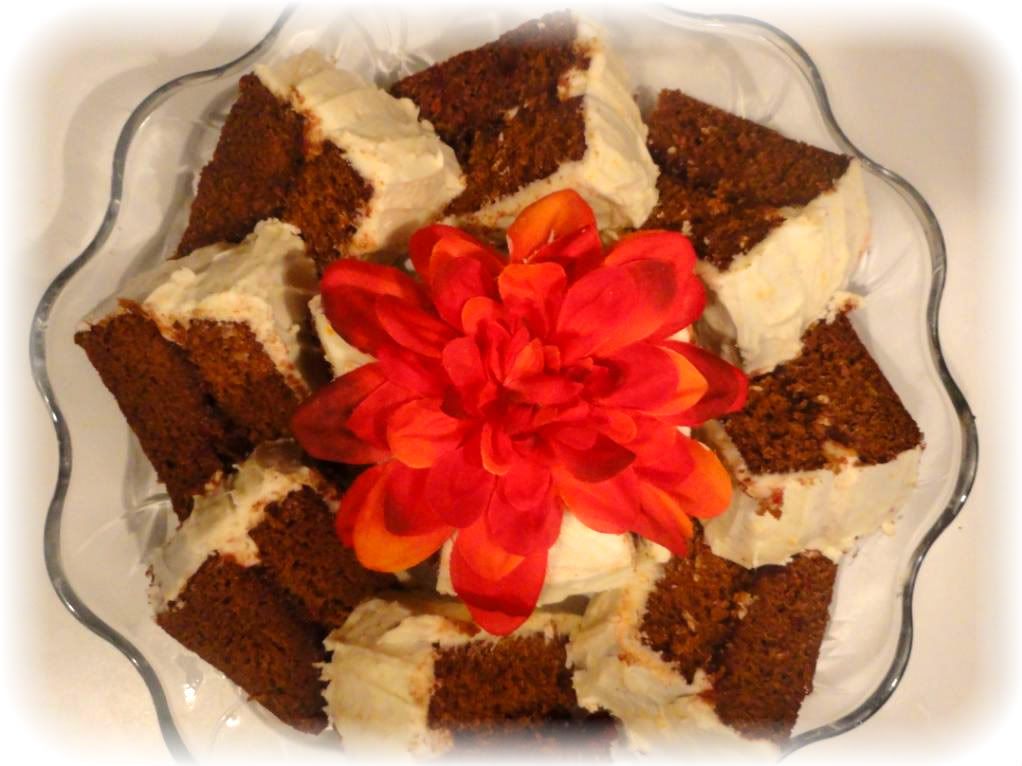
  • The recipe calls to make a three-tiered cake, but personally I always make a two-tiered cake instead of three. (For a few reasons: (1) three tiers is way too much cake for one slice, (2) sometimes one cake doesn't come out of the pan clean enough for my liking, so I always just plan to have a back-up layer (3) by only making two tiers I am able to sample the cake before serving it to guests.
  • If you plan to slice the cake before serving it, refrigerate it once you frost the cake; this will make the frosting and cake firm enough to have a clean slice. 
  •  For the lemon and orange zest, you can usually get 1 teaspoon out of one lemon, and 1 tablespoon out of 1- 1 1/2 oranges. 
  • You can garnish the cake with gingerbread cookies (which I didn't), but I think gingersnaps crumbled on top (or bottom) would also be really yummy.
  • If you choose to only make a two tiered cake like I do, use the additional layer to make 1/2 a cake. Slice it in half and prepare like you would a whole cake (filling and frosting). This also works well if you want to serve more cake for a larger crowd, pre-slice your cake like I did and you'll have at least 5 more slices.
  • I thought the cake tasted even better the day after, verses the day of, as the filling was able to sink in to part of the cake, so delicious!
Ok, now on to the recipe:

Gingerbread Cake with Cranberry Filling
Makes 1 (9-inch) cake)

CAKE:
1 cup vegetable oil
1 cup sugar
1 cup unsulfured molasses
3 large eggs
3 1/2 cups all-purpose flour
2 teaspoons ground ginger
2 teaspoons ground cinnamon
2 teaspoons baking soda
1 teaspoon lemon zest
1/2 teaspoon salt
1/8 teaspoon ground cloves
1 1/4 cups whole buttermilk

CRANBERRY FILLING:
(Makes about 1 cup)
16 ounce can whole berry cranberry sauce
1 tablespoon orange zest
2 tablespoons fresh orange juice

ORANGE CREAM CHEESE FROSTING:
(Makes about 3 cups)
8 ounces cream cheese -- softened
1/2 cup butter -- softened
1 tablespoon orange zest
4 1/2 cups confectioner's sugar

GARNISH: Gingerbread cookies

CAKE -
Preheat oven to 350 degrees. Spray 3 (9-inch) cake pans with non-stick cooking spray with flour.

In a large bowl, combine oil, sugar, molasses, and eggs. Beat at medium speed with an electric mixer until well combined.

In a medium bowl, combine flour, ginger, cinnamon, baking soda, lemon zest, salt, and cloves. Gradually add to oil mixture, alternately with buttermilk, beginning and ending with flour mixture. Pour evenly into prepared pans, and bake for 20 minutes, or until a wooden pick inserted in center comes out clean. Let cool in pans for 10 minutes. Remove from pans, and cook completely on wire racks. Spread Cranberry Filling evenly between layers. Spread Orange Cream Cheese Frosting on top and sides of cake. Garnish with gingerbread cookies, if desired. Note: Pepperidge Farm and Archway make gingerbread cookies.

Cranberry Filling -
In a medium saucepan, combine cranberry sauce, orange zest, and orange juice. Cook over medium-low heat for 15 minutes, or until thickened. Cover and chill for 2 hours. Makes about 1 cup.

Orange Cream Cheese Frosting -
In a large bowl, beat cream cheese, butter, and orange zest at medium speed with an electric mixer until creamy. Gradually beat in confectioner's sugar until smooth. Makes about 3 cups.

Source:
"Paula Deen's Holiday Baking 2008"

I am definitely going to be adding this to my favorites recipes and cannot wait to bake it again!

Thursday, November 10, 2011

Thankful Thursday: Thankful for God's Gifts

This Thankful Thursday I want to make note of how thankful I am for the talents and passion God has given to me. I absolutely love that He has instilled in me a joy in design, party planning, cooking, and decorating. (and writing)

Although at times I may get stressed in the moment about preparing for a party or being creatively stumped with a project, through it all I find so much joy in this path that I am on; the one He has designed just for me.

I am also truly thankful for the amazingly talented friends and family that He has also placed in my life that help to make each of my events such a huge success. Thank you to you all ...

Last weekend we celebrated the release of my book with my California family and I wanted to make sure you all got a bit of the action through the photos...hope you enjoy!

Photobucket

Photobucket

Photobucket

Photobucket

Photobucket

Photobucket

Photobucket

Photobucket

Photobucket

Wednesday, November 9, 2011

Woo-Hoo Wednesday: Fall Time Centerpiece

For my release party I really wanted to incorporate fall-time flare in with my party decor and in doing so I was able to have such a welcoming and fun entrance decor...

Photobucket

Photobucket

Using just a black sharpie and copying a script font on my computer I wrote out "Welcome Friends" on two pumpkins I got from Trade Joe's for 3 bucks a piece.  You could also use stencils from your local craft or scrapbooking store, but I felt free-handing it would give me more of the look I wanted.

So cute right?

I now have those same pumpkins as a centerpiece on my kitchen bistro table to welcome me each morning. I am in love...and cannot wait to play around with other decor using this same concept.


Photobucket

Tuesday, November 8, 2011

How- To Tuesday: Make one of the easiest dinners ever...

Even though it's pretty late this Tuesday evening, I just had to get back to you all at Honey Crust. Two weeks ago I posted my "Out of Office" reply as I was preparing to head out to CA for my cookbook release party. Little did I know that upon returning, my internet would be out for a week, the house would be in disarray, and I'd be headed back out of town for the weekend. Needless to say...this is how life has been...

Photobucket

A kid on each hip, comfy leggins and lotsa coffee. (And to answer your question, yes my son only has one sock on...not sure where the other ended up).

So today, as I tried to get caught back up on all the emails, marketing and housework, dinner was the last thing on my mind. My son hasn't been napping, so as a last resort in efforts to get him to sleep I tossed him in my moby wrap and tried to compose myself long enough to figure out something to make.

CHICKEN AND RICE was my answer. It literally took me 5 minutes to mix up and placed in the oven to forget about for an hour while I tended to other items that needed attention.

I really never took the time to realize how simple and delicious this recipe truly is. With only 5 ingredients and two dishes you can have an amazing home cooked meal that you don't have to fret over.

So here it goes - Your late night How-to Tuesday: Make one of the easiest dinners ever.

Photobucket

Ingredients:
4 boneless skinless chicken breasts
2 cans cream of celery (or chicken) soup
1 can filled with milk
1-2 TB seasoning salt
1 cup uncooked white rice

Mix together soup, milk and rice in bowl. Pour mixture into a greased 9x13 inch casserole dish. Place chicken breasts on top of rice mixture and sprinkle with seasoning salt. Cook in oven at 350 degrees (covered) for one hour, or until rice is tender.

Enjoy.

** My hubby and I have been on a chicken and rice burrito kick lately. Add a bit of shredded cheddar cheese, roll it up in a tortilla and sink your teeth into some creamy goodness.