Wednesday, August 31, 2011

Woo-Hoo Wednesday: Dress Up Sandwiches

In lieu of Labor Day coming up I wanted to give you another fun way to dress up a dish that you may want to serve at your summertime bbq or pool party.


Photobucket

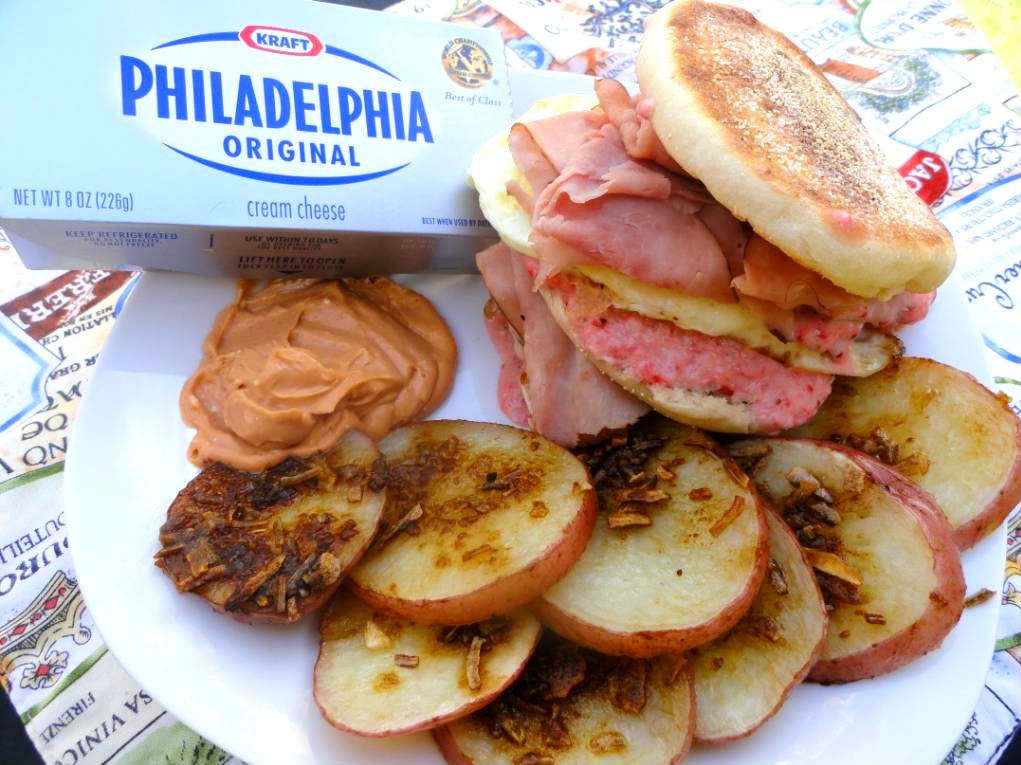
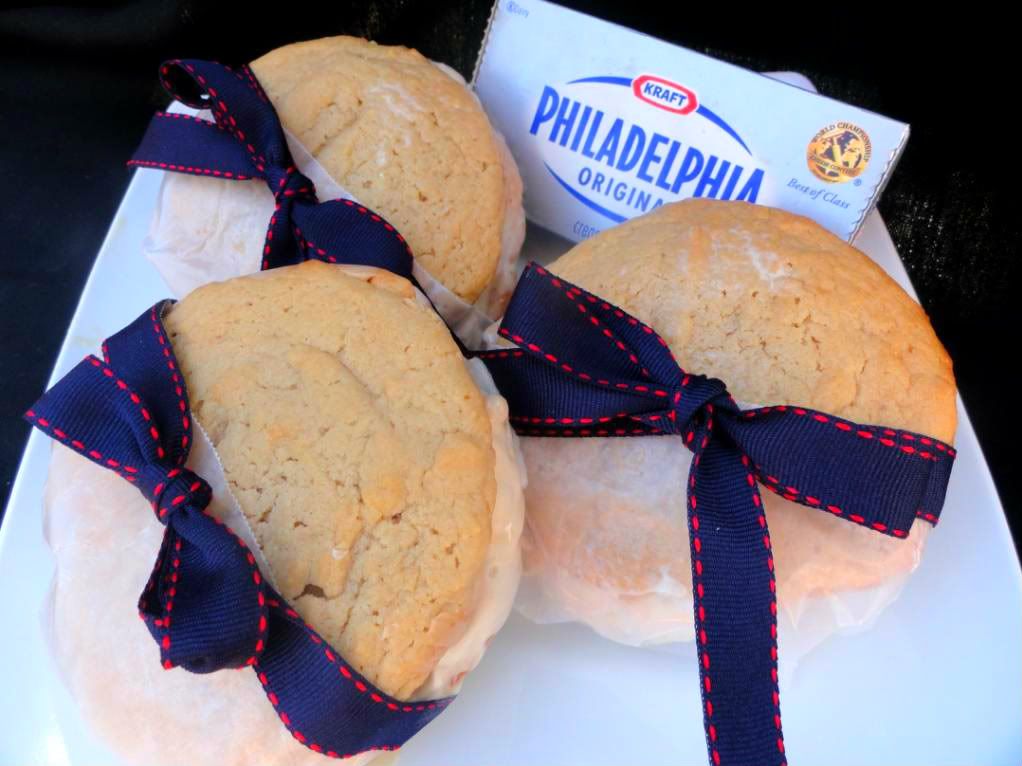
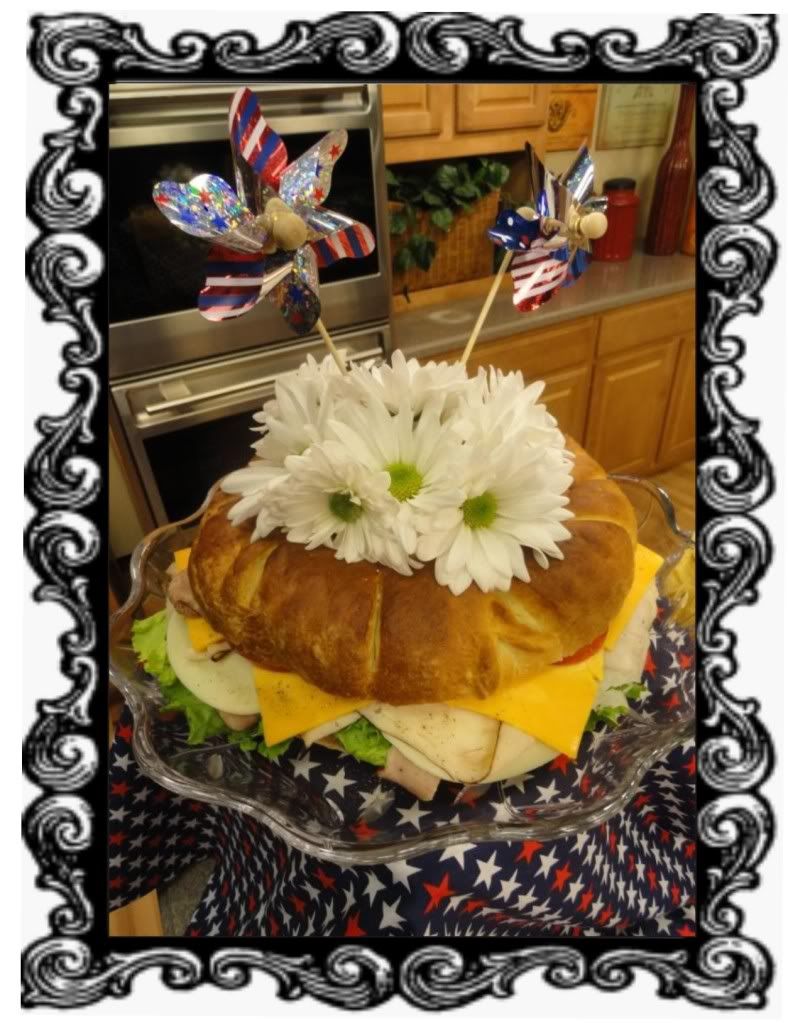
My recipe for Party Sandwiches makes for the perfect lunch time treat for everyone! And by serving it round like I have displayed up above, they really add to making your lunch look that more appetizing. But, first, since this is Wahoo Wednesday, where I give you tips on decorating and sprucing up your meals, lets focus on that for a minute.

Remember the scene from My Big Fat Greek Wedding?

Maria: What is it?
Harriet Miller: Its a bundt.
Maria: A bun?
Harriet: A bundT.
Maria: A Bondt?
Harriet: BUNDT BUUNDT!!
Maria: I know, its a cake-y!….(to friend) there’s a hole in this cake.

And then she follows up by putting a plant in it? That's totally me! Whenever I make my favorite Red Velvet Cake or a Pound Cake, or even my Party Sandwiches, I'm finding myself putting something in the "hole of the cake" 

Well if you find yourself like me or like the wonderful Greek women of My Big Fat Greek Wedding, then this post is for you.

Pick up either a few small pieces of green floral foam, or what I used was a small section of a left over wrapping paper roll (or a toilet paper roll would work too!) I wrapped it in aluminum foil so it doesn't touch the food and then add a few fresh cut flowers! For this sandwich I also added a few cute patriot windmills to the top too! Really the possibilities are endless when it comes to decorating the inside of circle meals :)

Have Fun...

OH yes, and on to the Party Sandwich. You can use two Pillsbury French Loaves and prior to baking in the oven, squeeze the ends together to form a circle. Bake as directed and then dress with your favorite meats, cheeses and sandwich toppings. (Make sure to leave any spreads off to the side, so your guests can add them as they please)

This same concept would also be cute for Valentines Day shaped into a heart.....

Enjoy!

Tuesday, August 30, 2011

How- To Tuesday: Remove the Smell of Garlic or Onions

Ever cut an onion or a piece of garlic for dinner and then have that wretched smell on your hands that lasts for days? Try rubbing your hands under cold water while rubbing your stainless steel knife that you used for cutting. Take the stainless steel knife and run cold water directly over the knife for about 30-45 seconds. Place your fingers on the center of the knife, avoiding the sharp blade, and slightly rub the knife. Repeat as necessary. This is not really a great trick for children and like I said,  watch out for the blade. 

Better yet, if you're really freaked out about using a knife, feel free to use a stainless steel spoon. It works the same and you avoid the danger of accidentally cutting yourself. I know some department stores also sell a stainless steel piece that looks like an egg or bar of soap. Works like a charm.


Photobucket
This Rub Away Bar can be purchased at Crate and Barrel

And --- since we're talking about the How-To's of removing the smell of garlic -- rubbing toothpaste on your hands does the trick too! But I'm thinking sticking to the stainless steel utensil is your quickest solution. :)


Photobucket

Saturday, August 27, 2011

Camel Eye

I feel like everyone I've talked to can remember back to a time where their mom or grandma made them the classic Camel Eye!

Photobucket

I just love how a simple recipe can take you back to a memory in an instant. I'm sure you can remember the plate it was served on, the seat where you sat and the smell of the kitchen as breakfast was being served...at least I can.

In my previous post I mentioned using cookie cutters to cut your mozzarella cheese for your caprese salad, well the same goes for making a camel eye. Update this "camel's eye" with a  fa-bu-lous new look, whether star shaped, squared or shaped like a heart your kids or loved ones will enjoy the ever so tasty, classic camel eye.


Recipe on page: 77 of Our First Year: Cost Effective Recipes from the Home of Newlyweds

** Photo compliments of Troeger Photography

Thursday, August 25, 2011

Thankful Thursday: Hand Mixer

Today I have decided that I am grateful for my hand mixer....

Photobucket

...and of course a story comes to mind. I will never forget the summer that my mom and brother came out to my home for the 4th of July. My mom was getting ready to bake something, when she grabbed my hand mixer, plugged it in and THEN tried to put the beaters in....she accidentally bumped the ON switch and her fingers got caught in the middle of the blending beaters! Although it didn't draw any blood or cause any major damage, it was definitely a scare and left a bit of a bruise. So thanks to that moment, every time I grab my mixer, I remember that moment!

So although I am not thankful for the pain my appliance caused to my mom, I am very grateful for the ease in baking that it allows me! I am thankful for all of the dozens of cookies I have baked, the moist cakes that it has helped me mix and the stiff peaks of meringue it has whipped together. 

Apparently the first hand mixer was invented in 1870 by a man named Turner Williams, and it wasn't until 1908 when the first electric hand mixer was invented, soon to be sold by KitchenAid.

As I was doing a bit of research on my hand mixer, I found sooo many interesting facts about the Countertop Mixer, So I have already decided what I will be thankful for NEXT THURSDAY! And you guessed it - my RED KitchenAid Stand Mixer....which I Love Love Love! Stay tuned...


Wednesday, August 24, 2011

Cake Mom Review of MY BOOK!

Photobucket

Thank you Cake Mom for the wonderful review of my cookbook:

Photobucket 

She is offering a give-away to win a free copy of my book. Check out the review and enter to win at the link below! And don't forget to tell your friends too!...you know they want a copy...


Woo-Hoo Wednesday: Summer Fruit Plate

Labor day is right around the corner and I'm sure if you are planning to attend any pool parties or bbq's that weekend, you've already begun to think about what passing dish you will bring. (or is that just me?) I love fruit that is in-season over the summer and what better to bring than a fruit platter. Why not spice up the boring old bowl of mixed fruit, and please do not bring a store bought arrangement, but create a beautiful masterpiece by using the fruit itself as your dishes. I love using different melons and pineapple to serve a fruit medley to my guests.

Photobucket

As a quick note, on a few occasions I had difficulty cutting my pineapple, while still keeping the shell in-tact, so my solution to this is (1) purchase 2 pineapples, one for the shell and one for the fruit or (2) purchase a couple can's of cubed pineapple that you can mix with the pieces you were able to cut from the fresh pineapple. Just make sure to purchase the pineapple cubes in its natural fruit juice, and not in a syrup.

If you plan to make a fruit arrangement, take a picture and send it my way to: info(at)a-sugarnspice-life(dot)com or post on my facebook. I look forward to seeing your pictures!


Tuesday, August 23, 2011

How- To Tuesday: Fry Bacon

Today I wanted to take a moment to talk about bacon.....although I do not eat bacon, I use to, and I remember it being so delicious. I'm kind of a freaky vegetarian....because I use to eat meat on a regular basis, I know the tastes and the enjoyment people get out of sinking their teeth into something so salty and tender as a piece of meat. If you know me, you know that I do not eat most meat because of texture issues that I developed about 8 or so years ago....don't ask me why, it's just what happened. hah! So anyways, when I prepare meat for people or create my recipes, I find enjoyment in watching those eating my meal because I know the pleasure one gets out of eating it.

So as I go over how to fry bacon, trust me, I know what its like to start salivating at just the smell of it!

Photobucket

First of all, I would recommend wearing an apron or definitely having a lid for your skillet while frying bacon; it tends to splatter and doesn't necessarily feel so nice on your skin or your favorite shirt!

You are going to want to use a large skillet and to fry 3 to 4 pieces of bacon at a time. If you can only do 1 or 2 at first, that is fine too.

Photobucket

Place the bacon side by side on your un-greased frying pan.

Turn your stove to medium-high heat and listen for your bacon to begin sizzling. You will know the bacon is ready to be flipped when it doesn't stick to the pan. Simply take a pair of tongs and flip each piece of bacon over. This is where the "pops" may happen---in that case, make sure you use the lid to block the splatters or have your cute little apron on already.

The bacon will slowly stop popping when it's pretty much done, but make sure to keep an eye on them so they don't turn too crispy. Once you feel the bacon is fried to your liking, place on a paper towel to drain any excess oil. Let cool and enjoy!

If you are planning a large breakfast for company, you can plan to make the bacon the day before. This frees you from having to clean up any grease splatters or spend extra time on cooking. Store the bacon in your refrigerator overnight in a plastic container. The bacon can be easily reheated in the microwave or oven for when guests arrive.

There are several delicious dishes that you can make with bacon...especially in my cookbook. Check out the Snuggle Pigs or Potato Skins...

Photobucket

Photobucket


Enjoy your BACON!


Photobucket

Saturday, August 20, 2011

Caprese Salad

Caprese Salads are one of my most favorite things to order when I go out. They always seems so delicious and each restaurant has it's own unique twist, all the while including juicy tomatoes, rich mozzarella and fresh basil.

Photobucket

In my cookbook, Our First Year, I  provide my own take on a caprese salad.

What I love about making them at home for special parties is the fact that I can use my cookie cutters to shape the cheese to fit my theme. I remember hosting a valentines dinner where I served each of my guests their own personal caprese salad with heart shaped mozzarella to accent. Everyone loved that special touch as the theme continued with heart shaped pasta and dessert!

Next time you're making your own salad, get a little crafty and take out your cookie cutters...you will be so pleased once you do!

**Photo compliments of Troeger Photography

Friday, August 19, 2011

A little Extra for RWOP

I know I'm usually only posting on my set days, but this was too good to pass up. I am currently entered into the Real Women of Philadelphia contest where you submit your very own recipes using the always delicious Philadelphia Cream Cheese. So far I have entered into two of their categories with recipes I whipped up the last two weeks. Let me know what you think....

Category: Breakfast Entree
The Breakfast Club

Photobucket


The Breakfast Club with Richly Seasoned Onion Potatoes overflows with thinly sliced salty bites of ham while dripping with a strawberry syrup Philadelphia cream cheese spread. As if the taste of Philadelphia cream cheese mixed with strawberries and syrup weren’t enough to keep the flavor of breakfast going, indulge yourself in the rich bites of Onion Potatoes submerged into a seasoned Philadelphia cream cheese dipping sauce. 

Category: Make To Impress Desserts
One Maple Bar, Please


Photobucket


My parents recently became owners of an ice cream parlor that in prior years had sold donuts as well. On a number of occasions they have had some local travelers stop in and ask for a maple bar and to their surprise are offered a scoop of homemade maple walnut ice cream. To all those donut lovers in town, this recipe is for you. Rich Philadelphia Cream Cheese Maple Frosting embraces the melting portion of sweet ice cream while you sink your teeth into a Philadelphia Cream Cheese Maple Cookie, all inspired by the ever so delicious Maple Bar.

Thursday, August 18, 2011

Thankful Thursday: Lemon Squeezer

Photobucket

Today I was thankful for my Lemon Squeezer. It has been so hot out here in AZ, especially with all the monsoons, that I was craving something refreshing to drink. I love homemade lemonade, which my parents make the best at their restaurant in Wickenburg,  but, since that's over an hour and a half away, I decided to make my own. Using my Lemon/Citrus Squeezer I squeezed a few lemons, added a bit of sugar and mixed with ice cold water. It was so delicious. Next time I think I might add a few fresh raspberries to the mix.

I have used my lemon squeezer quite a bit in the past few weeks actually, baking up some delicious Lemon Mini's for the fam and for my baby boy's dedication too!

Photobucket

I do have one confession to make though about my Lemon Squeezer. There has been a handful of times where I've actually used it as a hammer, and surprisingly it has worked VERY WELL -- So that once single usage utensil, now serves as a multipurpose tool for all of my household needs :)

Wednesday, August 17, 2011

Woo-Hoo Wednesday: Summer Time Centerpieces

Photobucket

For my sister-in-laws bridal shower I was searching for a *picnic themed* centerpiece but through hours of skimming through Google images, nothing fit my fancy.  I knew I wanted to use watermelons, because to me that is a signature picnic fruit.

So after playing a while, I was so thrilled with the outcome of the centerpieces I designed.

First I took a small watermelon and sliced it in half. For my sample pieces I tied a ribbon around the melon and then inserted assorted flowers. What is great about using the watermelon, is that it's a natural vase, providing the flowers with water, so they did not wilt up while on the tables for the shower. I think they came out great and I cannot wait to use this same concept again for a future party.

Tuesday, August 16, 2011

How-To Tuesday: Remove "Hard Water" Stains

Listen up everyone...I think this is the best advice I've learned yet and the fact that I figured it out several months ago and am still excited means it's absolutely amazing. (for those of you that already knew this information..please don't burst my bubble). Since moving to our newest place of residence almost two years ago, I began to notice that my dishes (mainly my glass cups) started to look a bit cloudy, as if there was some sort of residue on them. I became even embarrassed when people would come over, and would promise them while bringing over what looked to be a milky cup of water, that the glass was clean. Well, one of my dearest friends from CA was at home when her mom began to notice the same thing. She told her to get in contact with me to figure out how to get rid of it. Between the two of us we search the internet to figure out how to rid this filthy film! Want to know the solution?????

Photobucket

VINEGAR! When in doubt, vinegar is always the answer....hah...well maybe not always, but it sure does amazing things.

To solve our filmy residue, we poured about a cup of vinegar into the base of the dishwasher and ran on a normal cycle. To my surprise, the dishes came out sparkling clean! I now pour vinegar in the bottom about every 2-3 washes.  I have been raving about this for months now, which I'm sure my friends and family are sick of, but seriously...isn't that amazing?

And here's the kicker - I had thought it was from our hard water out here in Arizona, but really, some companies are putting in additional *yucky* ingredients in to the washing detergent (mainly the cheapy kinds that I buy) that tends to leave this residue.....MEANING --- WE'VE BEEN DRINKING/EATING IT TOO! Ugh. But not any more..thanks to my good ol pal Vinegar. 

Here are a few additional *miracles* vinegar can do. (found on the side of the vinegar box that I bought from Sam's Club)

*Ants: Ant invasions can be deterred by washing counter tops, cabinets and floors with distilled vinegar
*Grease: Filmy dirt and greasy residue can be removed from stove and refrigerator by wiping with vinegar
*Grass or Weeds: Kill unwanted grass on sidewalks and driveways by pouring on vinegar
*Chrome: To polish chrome and stainless steel, moisten a cloth with white vinegar and wipe clean
*Shower Curtain: Rub a cloth dampened with vinegar to remove soapy, steamed-in film and mildew from your plastic shower curtain. Then rinse clean.
*Irons: Remove burn stains from your electric iron by mixing one part salt with one part vinegar in a heated small aluminum pan. Use this mix to polish the iron as you would silver.
*Vegetables: Liven up slightly wilted vegetables by soaking them in cold water and vinegar
*Flowers: Add two tbsp. of vinegar plus three tbsp. of sugar to a quart of warm water to keep fresh cut flowers blooming longer
*Cabbage: Add vinegar to the cooking water of boiling cabbage to prevent the odor from permeating the house
*Rice: A tsp of vinegar added to the water of boiling rice makes it white and fluffy
*Cheese: Keep cheese moist and fresh by wrapping it in a cloth that has been dampened with vinegar and sealed in an air-tight wrap or container

There were many more helpful facts about vinegar, but these were my favorite!
You're totally amazed aren't you?


Saturday, August 13, 2011

I just couldn't help myself

I just couldn't help myself....but I baked a few more shortcakes this morning!!! So delicious. My excuse was that we were out of milk (1%) and THAT'S WHY I had to make something else for breakfast, rather than sipping down the usual Carnation Instant Breakfast.....But really I was craving the deliciousness of fruit accompanied by sweet biscuits and fluffy whipped cream.

We didn't have any strawberries this morning, so I opened up some peaches and vwa-la! Breakfast.....................................................and afternoon snack...............and possibly even before bed.
Photobucket

I think next time I want to heat up some berries to put over top; blueberries, raspberries, boysenberries....I think I'm salivating as I type..my goodness


Strawberry Shortcake

Strawberry Shortcake ---

Strawberry Shortcake --- wow

Strawberry Shortcake --- so simple, so delicious.

I often forget just how amazing strawberry shortcake really is. It's one of those desserts that is so ridiculously easy to make, yet I often overlook it when planning a complete meal for guests or even just ourselves.

Photobucket

Well, we were having family over to meet our son for the first time and what started out as just 3 people along with our family, quickly turned into dinner for 14. After planning the meal, I then moved on to dessert and strawberry shortcake seemed the obvious answer. I grabbed my Bisquick and whipped up two batches of shortcake biscuits and started to slice up my strawberries. (there is a yummy strawberry shortcake recipe on the side of every Bisquick box.) Unfortunately that afternoon, my daughter got sick and the three of us ended up playing it low key in my bedroom, while my husband entertained his family with dinner in our back yard. To my surprise though, the next morning I realized that my dessert had not been served. Not sure if I really thought that was a good thing or a bad thing, because I then got to enjoy strawberry shortcake as my breakfast for the next week, oh and for my afternoon snack and dessert each day too! With each bite of strawberries, whipped cream and sweet biscuit I was reminded just how much I LOVE strawberry shortcake.

Grab yourself a box of Bisquick ASAP -- strawberries are in season! :)

Thursday, August 11, 2011

Thankful Thursday: Pan Scraper

Today I sorted through my utensil drawer searching for my pan scraper. I had received it along with my favorite Pampered Chef Pizza Stone as a wedding gift, but this little nylon scraper has helped me more than just with cleaning crumbs off my stone.


Photobucket

I really should have a special spot for my scraper, as I am continuously searching for it, like I do with my orange peeler and as always, when I'm about to give up, there it is!

For the longest time, I only used the scraper when using my pizza stone for breads, pizzas and cookies, but one afternoon I had rolled out dough for homemade cinnamon rolls, when I became frustrated that I could not clean the dough off my counter top. I remembered my pan scraper and with a little water the counter was sparkling clean.

At only $2.75 these are a must buy if you ask me.

Wednesday, August 10, 2011

Seating Arrangements

Last spring we had the honor of attending my husbands closest friends wedding in California. It was at a gorgeous outdoor venue in Northern CA and the bride and her friends did most of the decor and arrangements. I found that the seating arrangements were set in a very unique manner that I had never seen before.

Photobucket

She printed each of our names and table numbers on assorted colored paper. Then decorated an old window with ribbons and the printed paper. They then placed each of the windows in the bush area as we entered the venue. It was so neat and beautifully arranged. I thought this same idea could easily be used for an intimate bridal or baby shower as well. Very clever!

What unique ways have you seen or done seating arrangements? Leave your comments below.

Tuesday, August 9, 2011

How-To Tuesday : Roll Out Dough

My family is a strong believer in making our own crusts for pies, so I learned to roll dough at a young age. I think there is only one pre-made, store-bought crust that my aunt will ever consider buying and that's if she is running behind or wants to have a back-up dessert prepared for an unexpected visitor. (I believe it's from Trader Joes)

Rolling dough really isn't that difficult, but it does take some practice to be successful. I remember my husband helping me once with dough that I had prepared and he tried to force it flat all at once with the rolling pin....sometimes I forget the things I learned growing up are alien to those who never baked...

First, you want to ensure that your dough is chilled. It will be easier to roll out. Also, make sure you have your pie dish near you so you can easily transfer the dough to your dish. You will want to lightly dust your counter or surface with flour to keep the dough from sticking, as well as your rolling pin. Try not to leave too much flour on your surface, as it will stick to your dough and dry it out when baking. Next, pat the dough with your hands to shape it into a thin patty shape. Place the rolling pin in the center of the dough and start rolling. You will want to apply pressure in the center of the dough and then less pressure toward the outer edge. Once the dough is pretty flat, you will want to apply even amounts of pressure across the whole piece. You always want to roll from the center of the dough outward.

Don't try to make the dough flat in your first roll. You want to work the dough into the desired thickness. If the dough begins to stick to your rolling pin, feel free to add more flour to the pin and even to the top of the dough. You want to roll the dough while it is still chilled. Once rolled out, place dough in your pie dish and remove the extra dough that overflows.

Seems simple enough, right?

**Quick tip for transferring the dough from your counter to the pie dish...Fold your rolled out dough in half, and then again in half so you have what looks like a quarter of the dough. Next, take your folded dough and place the *point* in the center of your dish. Begin to unfold until completely covering the dish. This process will ensure a successful transfer without any tears or rips in the dough.

Saturday, August 6, 2011

Macaroni and Cheese

I'm sitting here sipping my coffee, before both the kids are up and hubby's still snuggled in bed. I honestly cannot remember the last time that this has happened, between sleep deprivation, our daughter teething or our newborn waking up *ahead of schedule* I'm usually taking as much sleep as I can get. But today, my brother, sister and nephew are driving in for our son's dedication, so they should be arriving any minute now. So up I got, made my coffee and sat down for a little peace and quiet.

You may think it's odd that I'm thinking of Mac & Cheese so early in the morning, but since I've found a few noodles here in the couch from my daughters lunch yesterday I figured it's fitting to make this my Weekend Wrap topic for today.

My husband and I love macaroni and cheese. Whether it's Kraft out of the box, Velveeta with shells, or someones family recipe we usually devour as much as we possibly can. Well, I've never actually made my own macaroni and cheese, other than from the box of Kraft, but since my husband was really begging for it I decided to create my own.

Photobucket

I picked up some Velveeta cheese, plus had some feta cheese and cheddar cheese at home I planned to use as well. The secret to having creamy macaroni and cheese, no matter what other cheeses you add, is to use condensed milk in the recipe. It keeps everything from drying out. If you are backing your mac & cheese though and it begins to dry out, (after adding the condensed milk) you can pour a little bit of regular milk in while its in the oven.

Photobucket

The mac and cheese came out delicious and I look forward to experimenting a bit with other cheeses as well as some sort of topping....I'm thinking Ritz crackers...or something mixed with Italian herbs. Yum.

In case you'd like to take a whack at the mac & cheese, I did a huge no-no in my book and didn't write down my recipe (which is pretty much the whole motivation behind why I wrote my cookbook) but anyways. I cooked the noodles as directed. Then put in to a 9x13 inch casserole dish. Cut up a little less than a half a block of Velveeta, about a cup of feta cheese, probably a cup or so cheddar cheese, sprinkled in some Parmesan, added salt, pepper and garlic, and one can of condensed milk. Threw it in the oven at 350 until the cheese melted...about 30-45 minutes.

Next time I'll write down the recipe :)   

What are your guy's secrets to making creamy mac & cheese?

Thursday, August 4, 2011

Thankful Thursday: Wooden Spoons

This week I let my daughter pick out the utensil that "we" are thankful for, so I opened up my drawer of utensils, turned my head as I held my almost two year old up to grab a utensil....and of course she chose the WOODEN SPOON


Photobucket

Part of me thinks she must remember back when she was about three months old and "helped" me bake haha

Photobucket

I am thankful for the memories I have of watching my mom bake and being able to lick the wooden spoon. Or the joy I get when I  pull the gooey melted marshmellows off when making rice krispies. And I always smile and laugh when I remember this story.....

My Aunt has always been involved with her church and the children's nursery. Well one Sunday morning she brought in a bag of cooking utensils and sat with each of the children in a circle. One by one, each child pulled out a different utensil and would say what it was used for. One child pulled out a spatula and said his daddy used it to grill burgers with. Another child pulled out a ladle and said it was used to dish soup out into a bowl. Next was my little cousins turn and she pulled out the wooden spoon.....Now -- let me explain something really quick. My Aunt is a superb baker, I mean seriously, the things that come out of her kitchen leave you begging for more. She bakes quite often and is always sharing her goodies with friends and family. So when my cousin pulled the wooden spoon, of course she would say, "My mommy uses this when she bakes me cookies...." No, not my cousin....she pulls out the wooden spoon and says, "My mommy uses this to spank me"

I believe in that moment my Aunt stopped breathing and one of the children had to pick her jaw up from the ground. My Aunt had never spanked her with a wooden spoon, nor with any other utensil for that matter. She about died when she heard those words.....and for all of use.....we die every time we hear the story!

Wednesday, August 3, 2011

Marriage Vows

I, Jaclyn, take thee, Jeffrey to be my lawful wedded Husband, to have and to hold from this day forward, for better for worse, for richer for poorer, in sickness and in health to love, cherish and to obey till death do us part, according to God's holy ordinance, and thereto I give thee my troth.....

Is that how your marriage vows went? Or did you write your own? I know many people decide with their fiance's that they will each write their own vows only to be read for the first time to one another on their wedding day. For my husband and I, I really don't think the conversation ever even came up --- we just planned to read the vows the Pastor had for us -- traditional - "with this ring, I thee wed...."


Well, my cousin and her husband were married this year on New Year's Day at a beautiful estate in the Murrieta Valley. After her wedding she was inspired by a sign she saw in a store and asked if I would design her wedding vows similar to the sign.....Here is the photo she provided:


Photobucket

I absolutely loved the "inspiration sign" and was so excited to begin designing her and her husband's vows. She planned to print the artwork and have each of their vows hung in her home.

They came out perfect!

Grooms Vows: 

Photobucket

Brides Vows: 

Photobucket

If you are interested in me designing something similar for you, please let me know! I'd love to do this again :)


Photobucket

Tuesday, August 2, 2011

How-To Tuesday : Hard Boil An Egg

**I must take a moment to first tell you how ecstatic I currently am at this moment...I just woke up about 15 minutes ago to realize that I actually slept the ENTIRE night through....which means my 2 month old slept the entire night through --- waa hoo!!! (ok, maybe I should have blogged about that on "waa-hoo" wednesday, but I just had to let you all know.... we shall see how the rest of the week goes**

Alrighty, How-To Tuesday. I wanted to start off the series with something that I never realized I didn't know how to do until I moved out of my parents house. HOW TO HARD BOIL AN EGG.


Photobucket

I can picture my mom now, peeling the egg shells in our kitchen sink and me just waiting to dive in to a delicious egg salad sandwich, or slice a few for my salad. I guess I never actually asked her the process, just rejoiced over the final product.


Well, I began to crave egg salad sandwich and to my surprise, did not know where to start...I know crazy right? So I wanted to fill you all in so you don't find yourself in my same position.

When hard-boiling an egg, start with a large saucepan and place your desired amount of eggs at the bottom, do not layer your eggs.  Next, run water over the eggs until its about 1/2 an inch above the eggs and place the pan on the stove. Let the water and eggs come to a boil. Once boiling, remove the pan from the burner and place the pan on another section of the stove; cover with the lid. Let the eggs and water sit for 20 minutes.

After 20 minutes, pour eggs into a strainer and run cold water over the eggs. You can then place the eggs in the refrigerator or you can peel them right then.

To peel the egg, run cold water very low over the egg you want to peel. Tap the egg against the side of your sink or counter to crack the shell. Then remove the shell with your fingers, allowing the cold water to help get rid of some of the shell as well. The egg shell can go down the disposal, or you can throw the shell away.

Another tip for peeling eggs is to fill the pan up with water and peel each egg under the water after you have cracked it either on the counter or side of sink. Having the egg completely submerged makes for a smooth and easy peel. Plus, all of your shells are then left in the pan for an easy clean up.


Do you have any tips on how to peel a hard boiled egg?